292 lines
11 KiB
Markdown
292 lines
11 KiB
Markdown
# Contributing to Supervision 🛠️
|
|
|
|
Thank you for your interest in contributing to Supervision!
|
|
|
|
We are actively improving this library to reduce the amount of work you need to do to solve common computer vision problems.
|
|
|
|
## Code of Conduct
|
|
|
|
Please read and adhere to our [Code of Conduct](https://supervision.roboflow.com/latest/code_of_conduct/). This document outlines the expected behavior for all participants in our project.
|
|
|
|
## Table of Contents
|
|
|
|
- [Contribution Guidelines](#contribution-guidelines)
|
|
- [Contributing Features](#contributing-features)
|
|
- [How to Contribute Changes](#how-to-contribute-changes)
|
|
- [Installation for Contributors](#installation-for-contributors)
|
|
- [Code Style and Quality](#code-style-and-quality)
|
|
- [Pre-commit tool](#pre-commit-tool)
|
|
- [Docstrings](#docstrings)
|
|
- [Type checking](#type-checking)
|
|
- [Documentation](#documentation)
|
|
- [Cookbooks](#cookbooks)
|
|
- [Tests](#tests)
|
|
- [License](#license)
|
|
|
|
## Contribution Guidelines
|
|
|
|
We welcome contributions to:
|
|
|
|
1. Add a new feature to the library (guidance below).
|
|
2. Improve our documentation and add examples to make it clear how to leverage the supervision library.
|
|
3. Report bugs and issues in the project.
|
|
4. Submit a request for a new feature.
|
|
5. Improve our test coverage.
|
|
|
|
### Contributing Features ✨
|
|
|
|
Supervision is designed to provide generic utilities to solve problems. Thus, we focus on contributions that can have an impact on a wide range of projects.
|
|
|
|
For example, counting objects that cross a line anywhere on an image is a common problem in computer vision, but counting objects that cross a line 75% of the way through is less useful.
|
|
|
|
Before you contribute a new feature, consider submitting an Issue to discuss the feature so the community can weigh in and assist.
|
|
|
|
## How to Contribute Changes
|
|
|
|
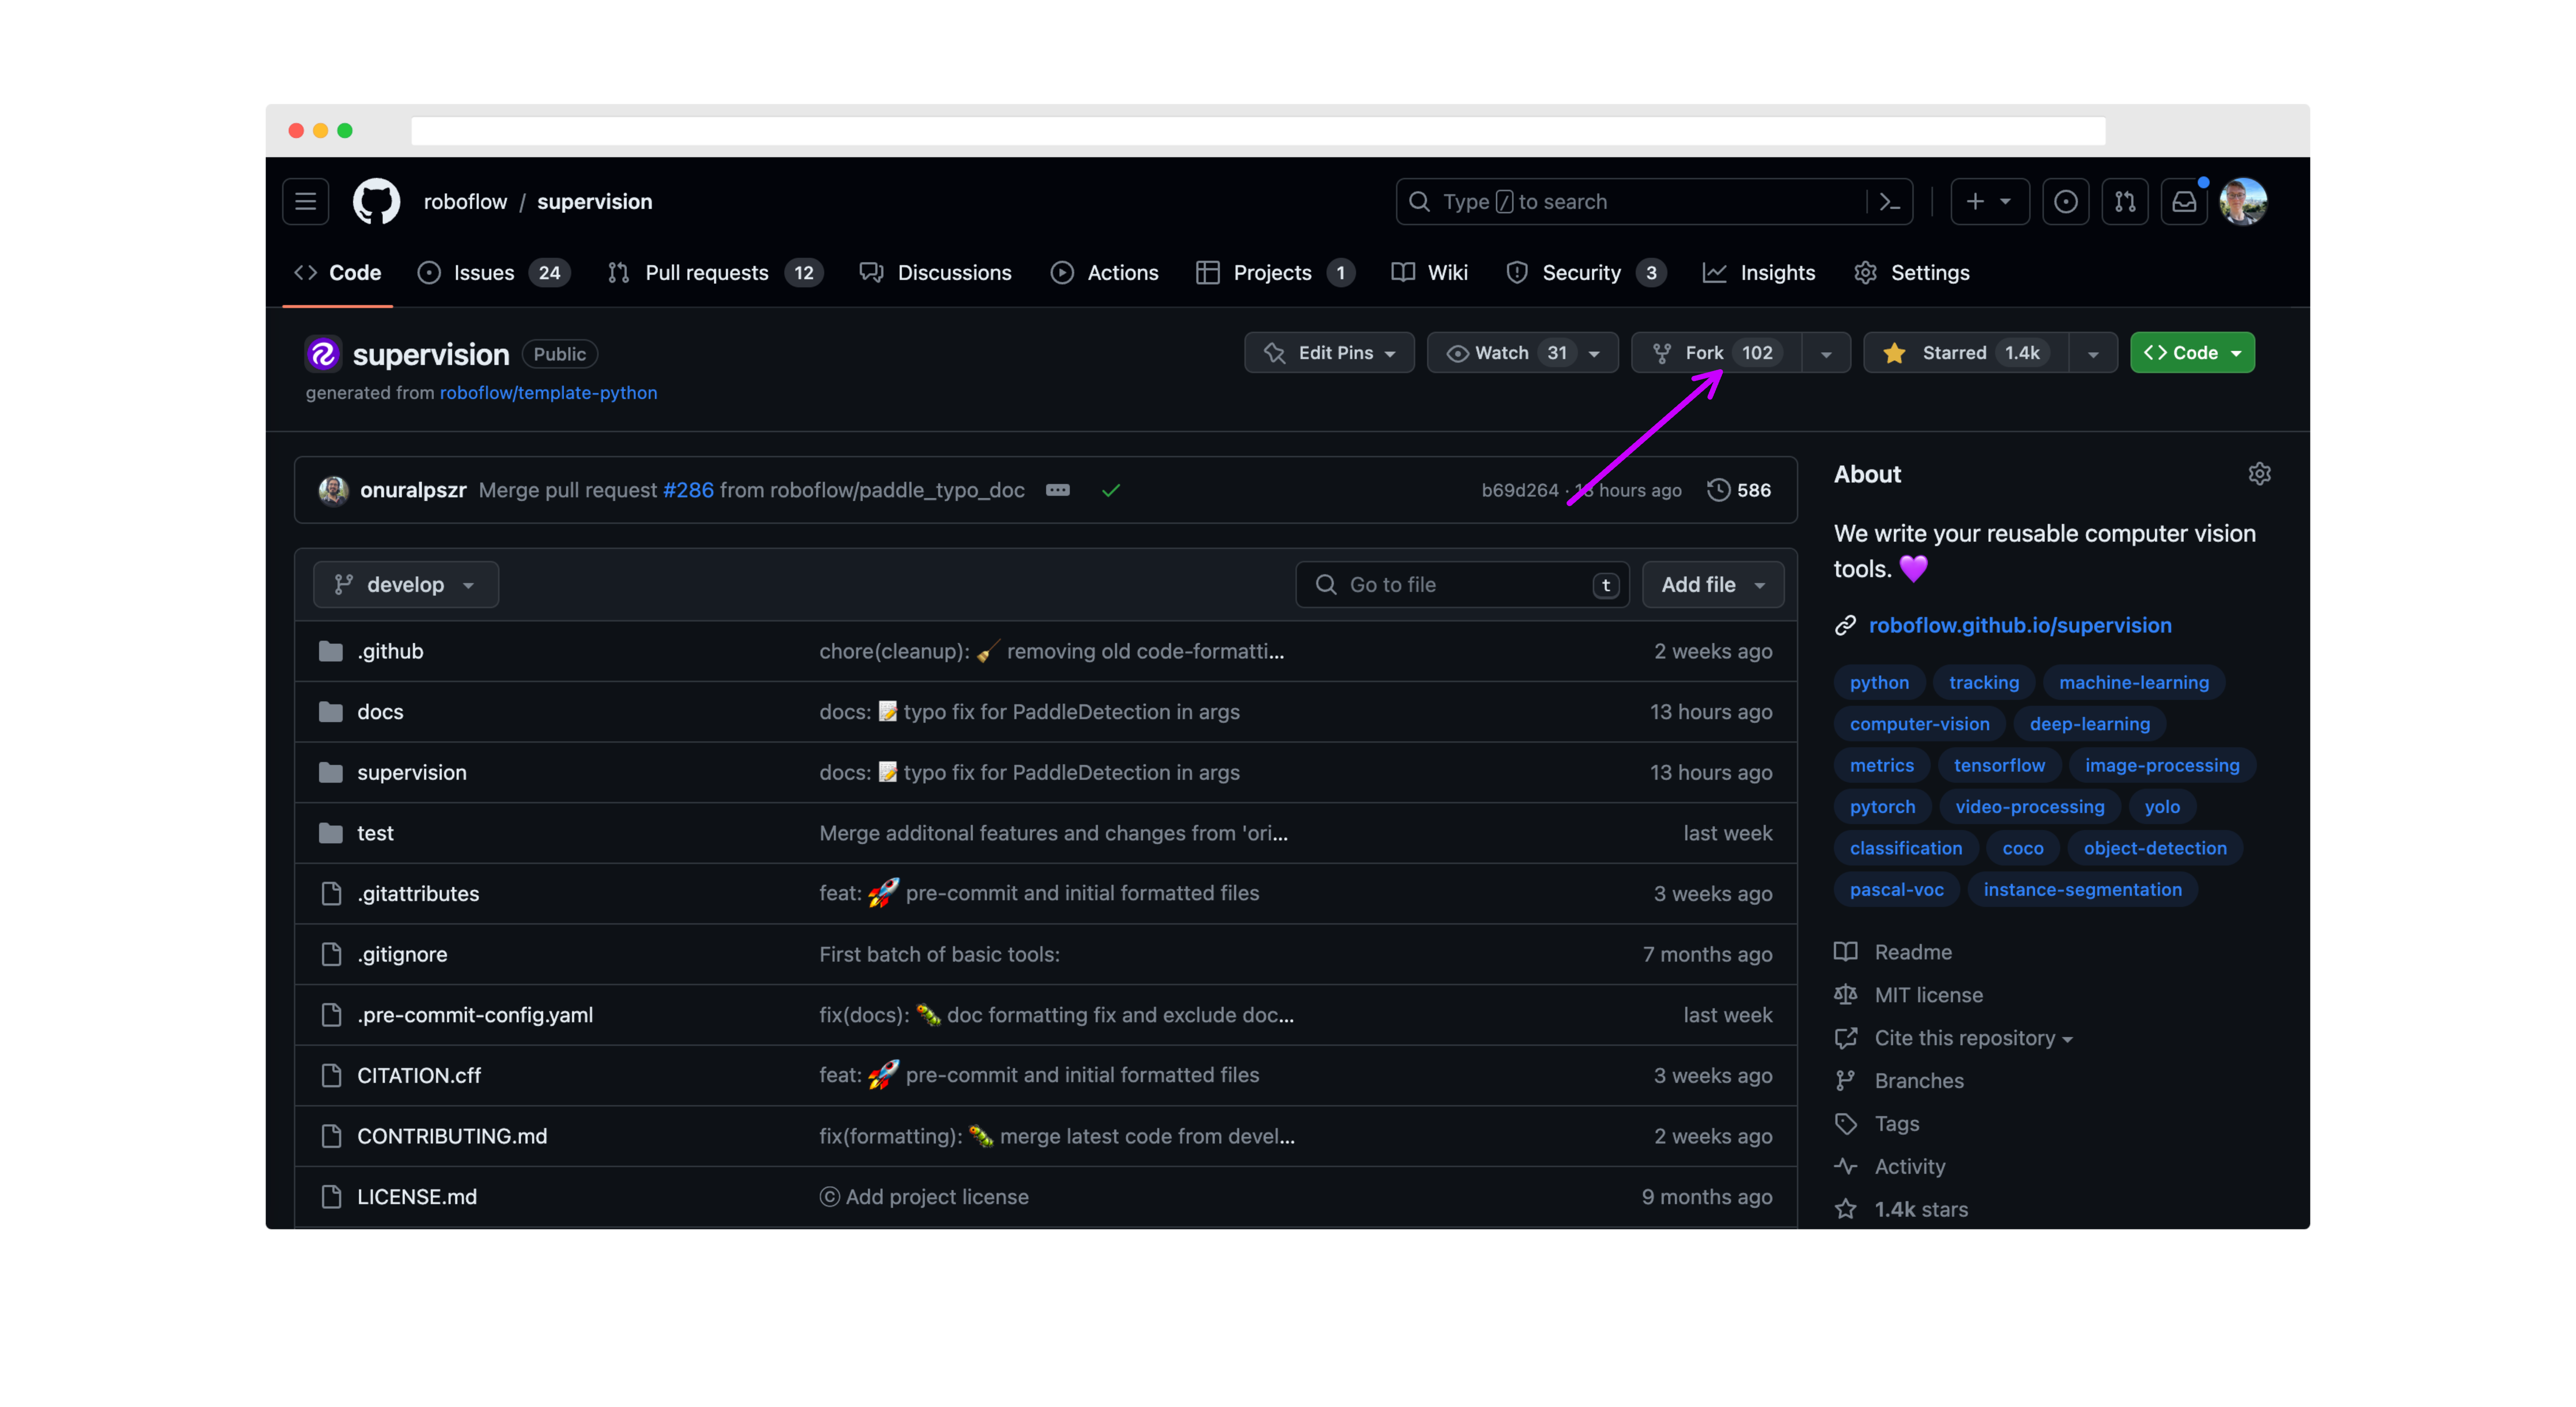
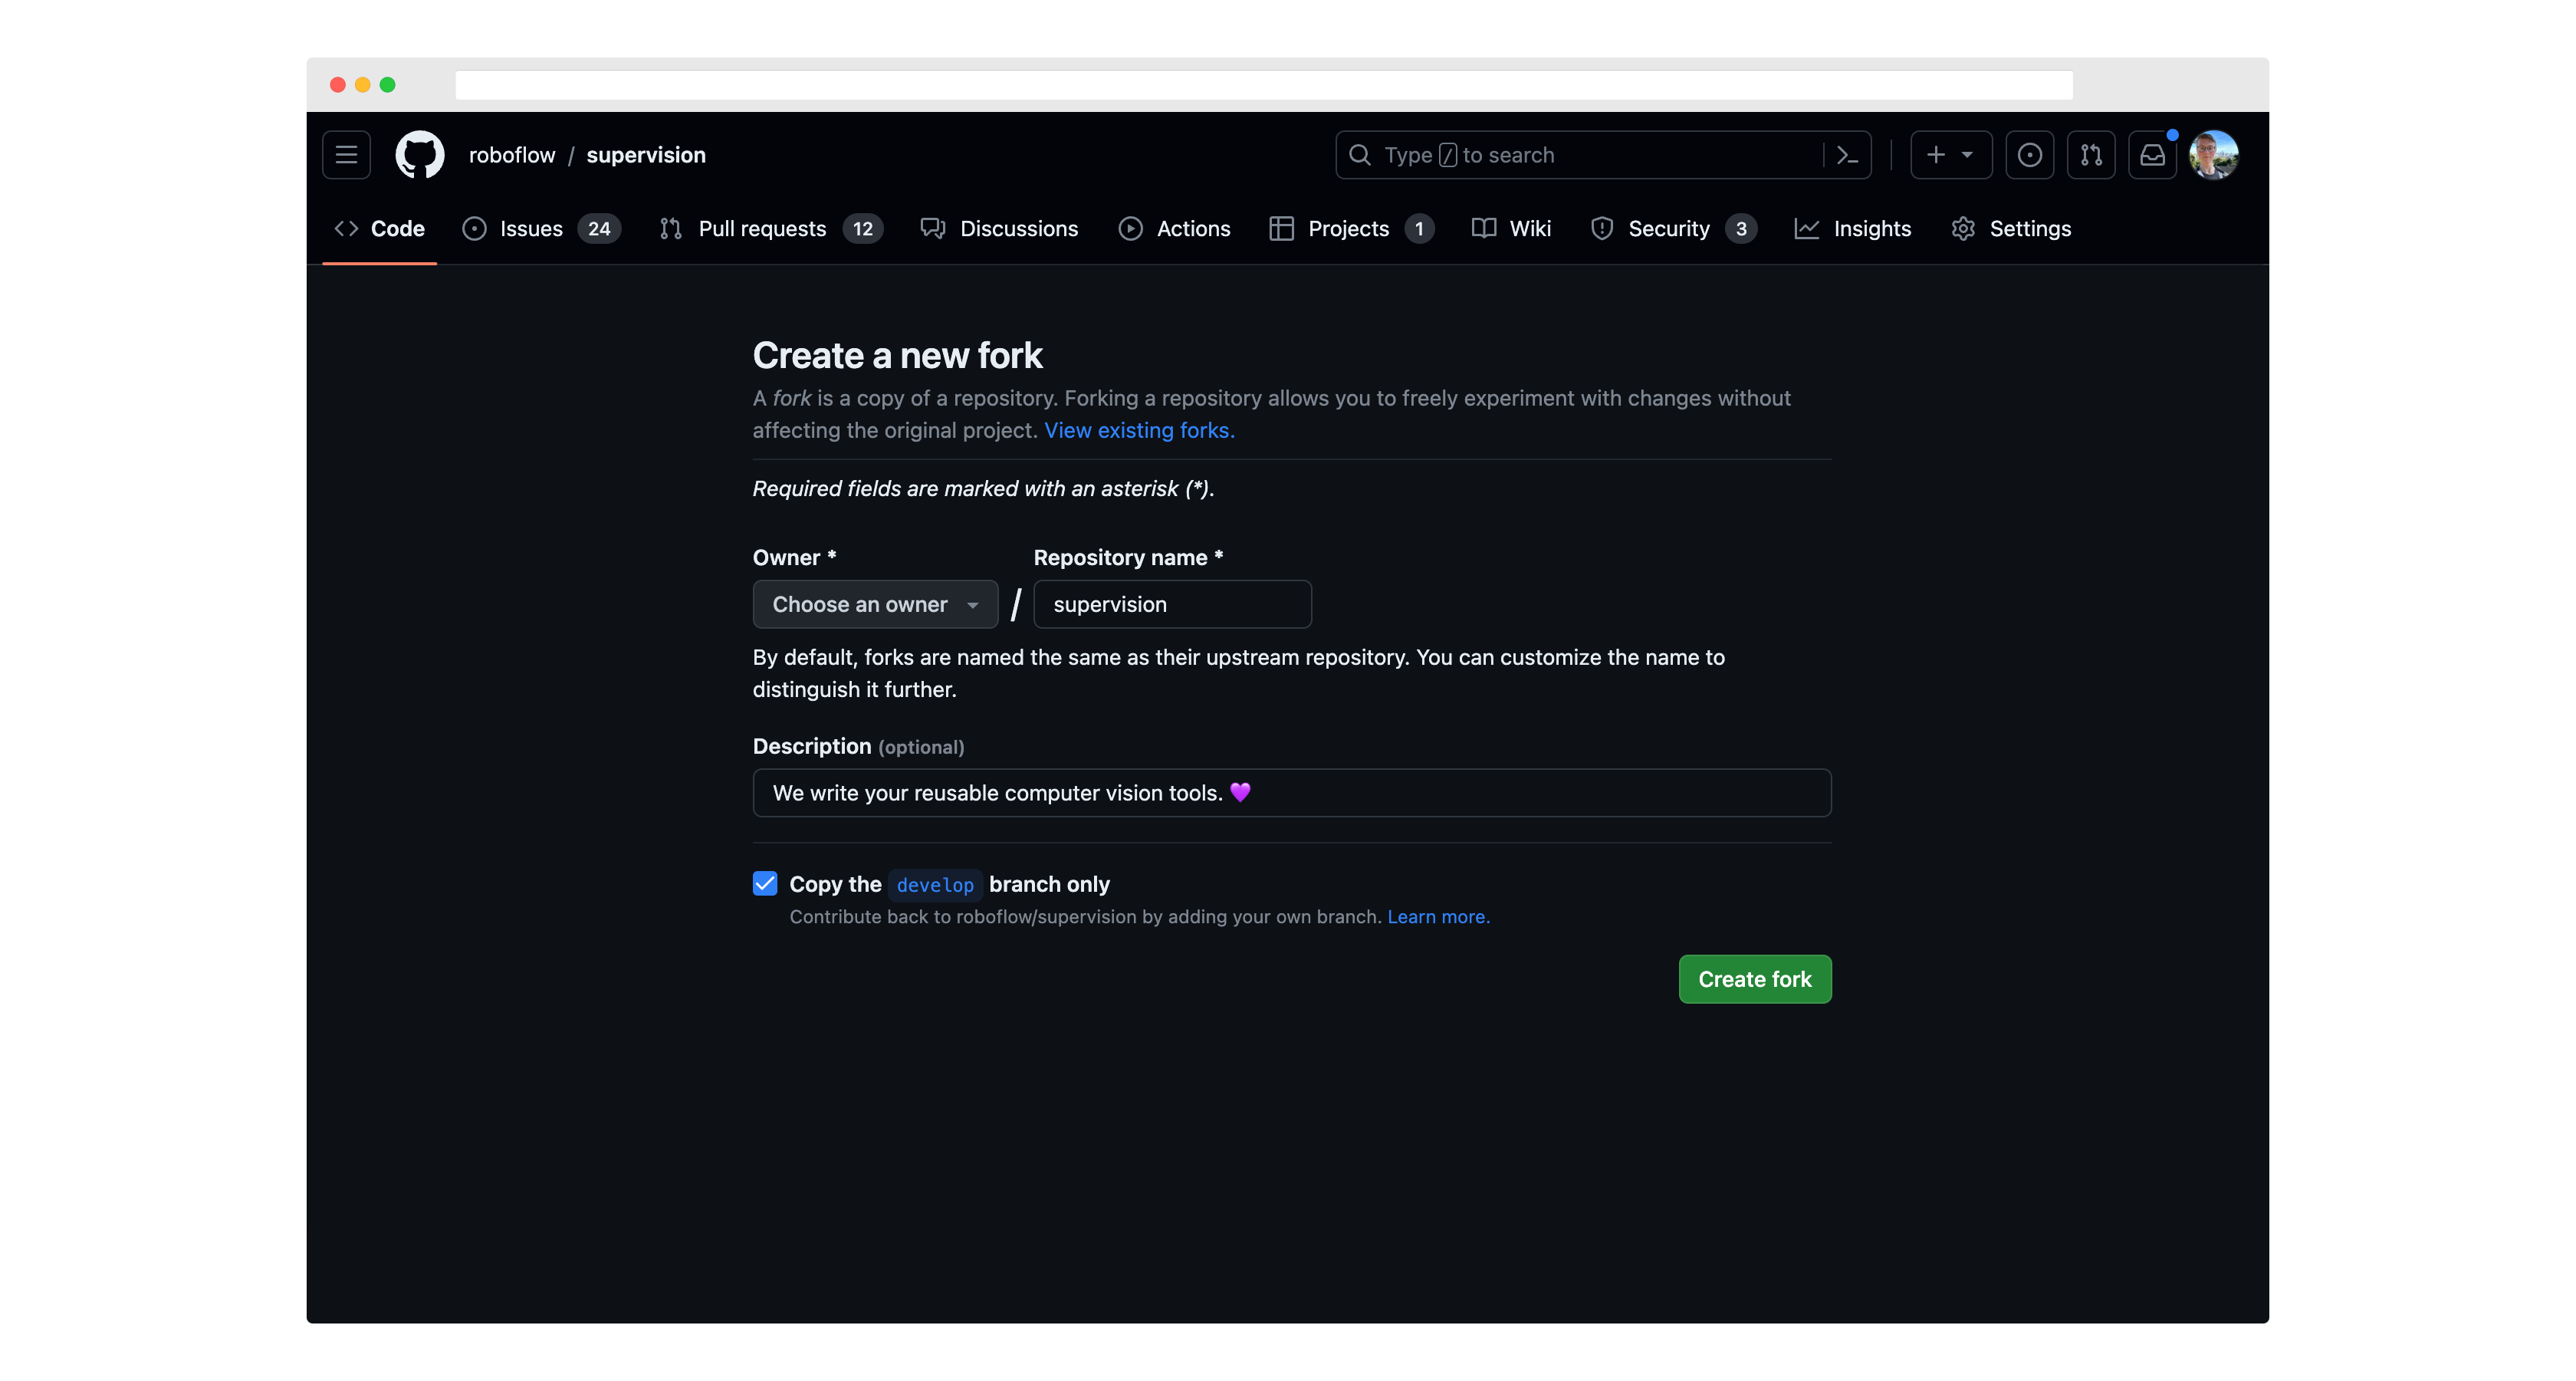
First, fork this repository to your own GitHub account. Click "fork" in the top corner of the `supervision` repository to get started:
|
|
|
|
|
|
|
|
|
|
|
|
Then, run `git clone` to download the project code to your computer.
|
|
|
|
You should also set up `roboflow/supervision` as an "upstream" remote (that is, tell git that the reference Supervision repository was the source of your fork of it):
|
|
|
|
```bash
|
|
git remote add upstream https://github.com/roboflow/supervision.git
|
|
git fetch upstream
|
|
```
|
|
|
|
Move to a new branch using the `git checkout` command:
|
|
|
|
```bash
|
|
git checkout -b <scope>/<your_branch_name> upstream/develop
|
|
```
|
|
|
|
The name you choose for your branch should describe the change you want to make and start with an appropriate prefix:
|
|
|
|
- `feat/`: for new features (e.g., `feat/line-counter`)
|
|
- `fix/`: for bug fixes (e.g., `fix/memory-leak`)
|
|
- `docs/`: for documentation changes (e.g., `docs/update-readme`)
|
|
- `chore/`: for routine tasks, maintenance, or tooling changes (e.g., `chore/update-dependencies`)
|
|
- `test/`: for adding or modifying tests (e.g., `test/add-unit-tests`)
|
|
- `refactor/`: for code refactoring (e.g., `refactor/simplify-algorithm`)
|
|
|
|
Make any changes you want to the project code, then run the following commands to commit your changes:
|
|
|
|
```bash
|
|
git add -A
|
|
git commit -m "feat: add line counter functionality"
|
|
git push -u origin <your_branch_name>
|
|
```
|
|
|
|
Use conventional commit messages to clearly describe your changes. The format is:
|
|
|
|
```
|
|
<type>[optional scope]: <description>
|
|
```
|
|
|
|
Common types include:
|
|
|
|
- `feat`: A new feature
|
|
- `fix`: A bug fix
|
|
- `docs`: Documentation only changes
|
|
- `style`: Changes that do not affect the meaning of the code (white-space, formatting, etc)
|
|
- `refactor`: A code change that neither fixes a bug nor adds a feature
|
|
- `perf`: A code change that improves performance
|
|
- `test`: Adding missing tests or correcting existing tests
|
|
- `chore`: Changes to the build process or auxiliary tools and libraries
|
|
|
|
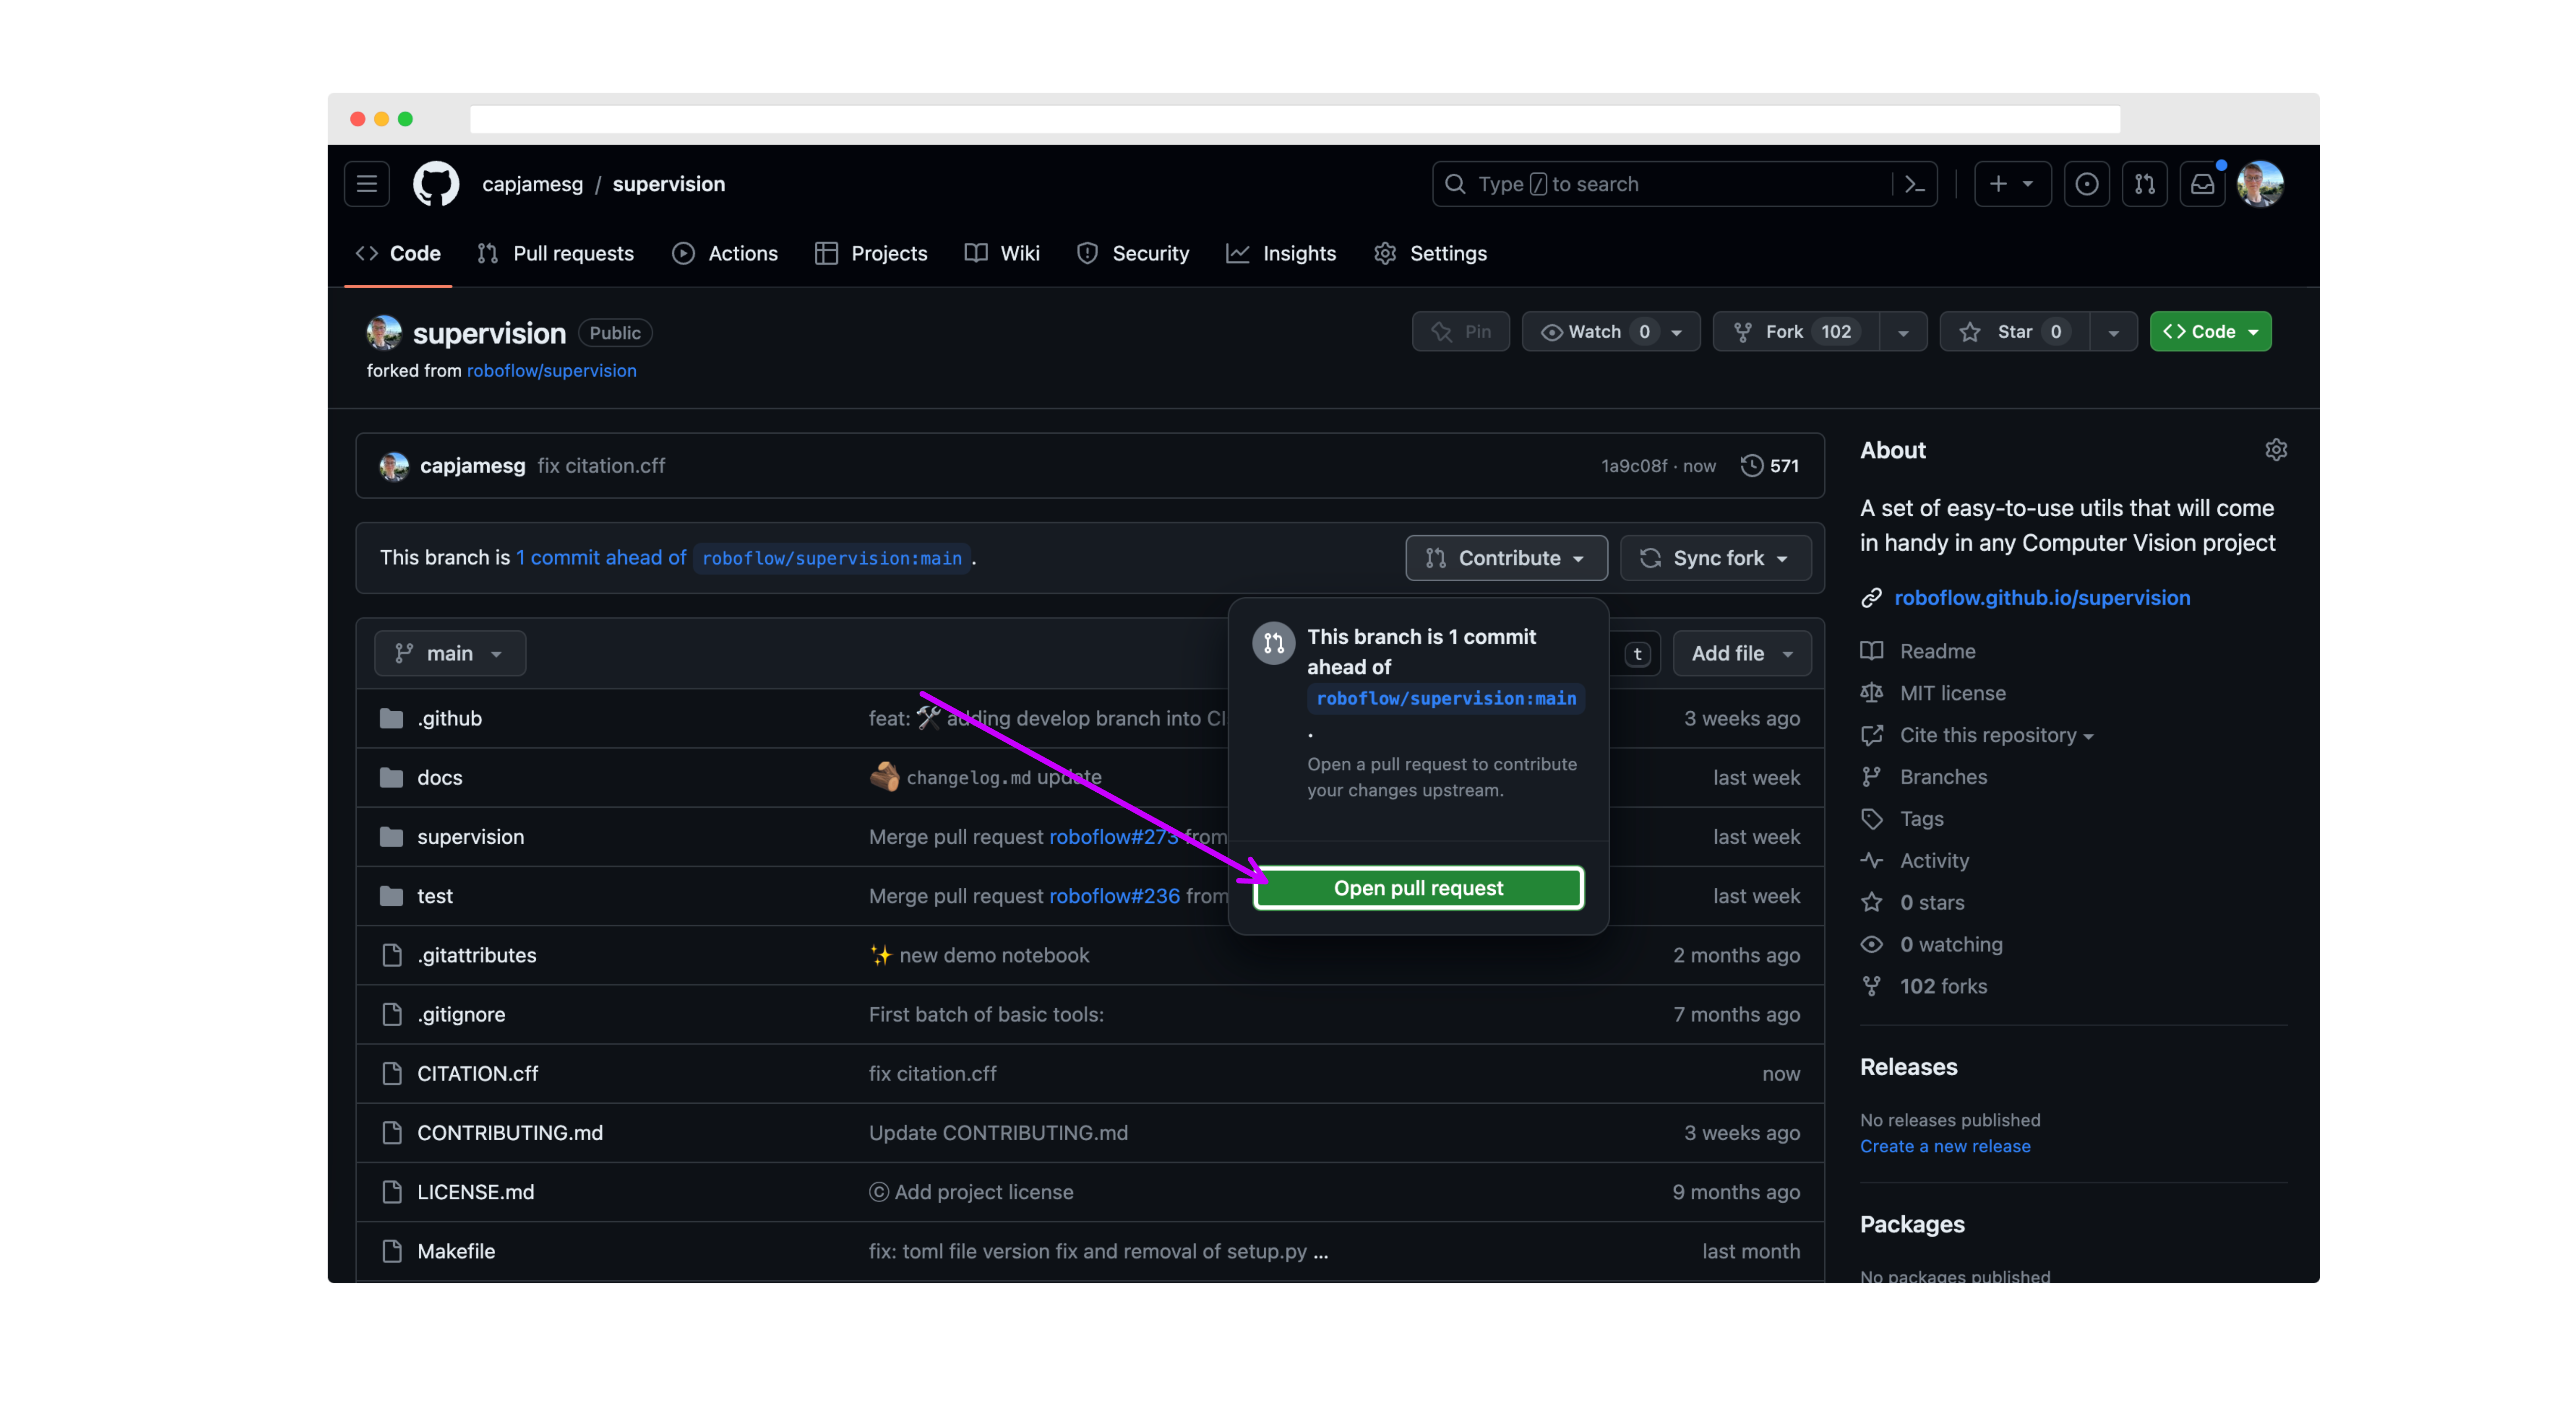
Then, go back to your fork of the `supervision` repository, click "Pull Requests", and click "New Pull Request".
|
|
|
|
|
|
|
|
Make sure the `base` branch is `develop` before submitting your PR.
|
|
|
|
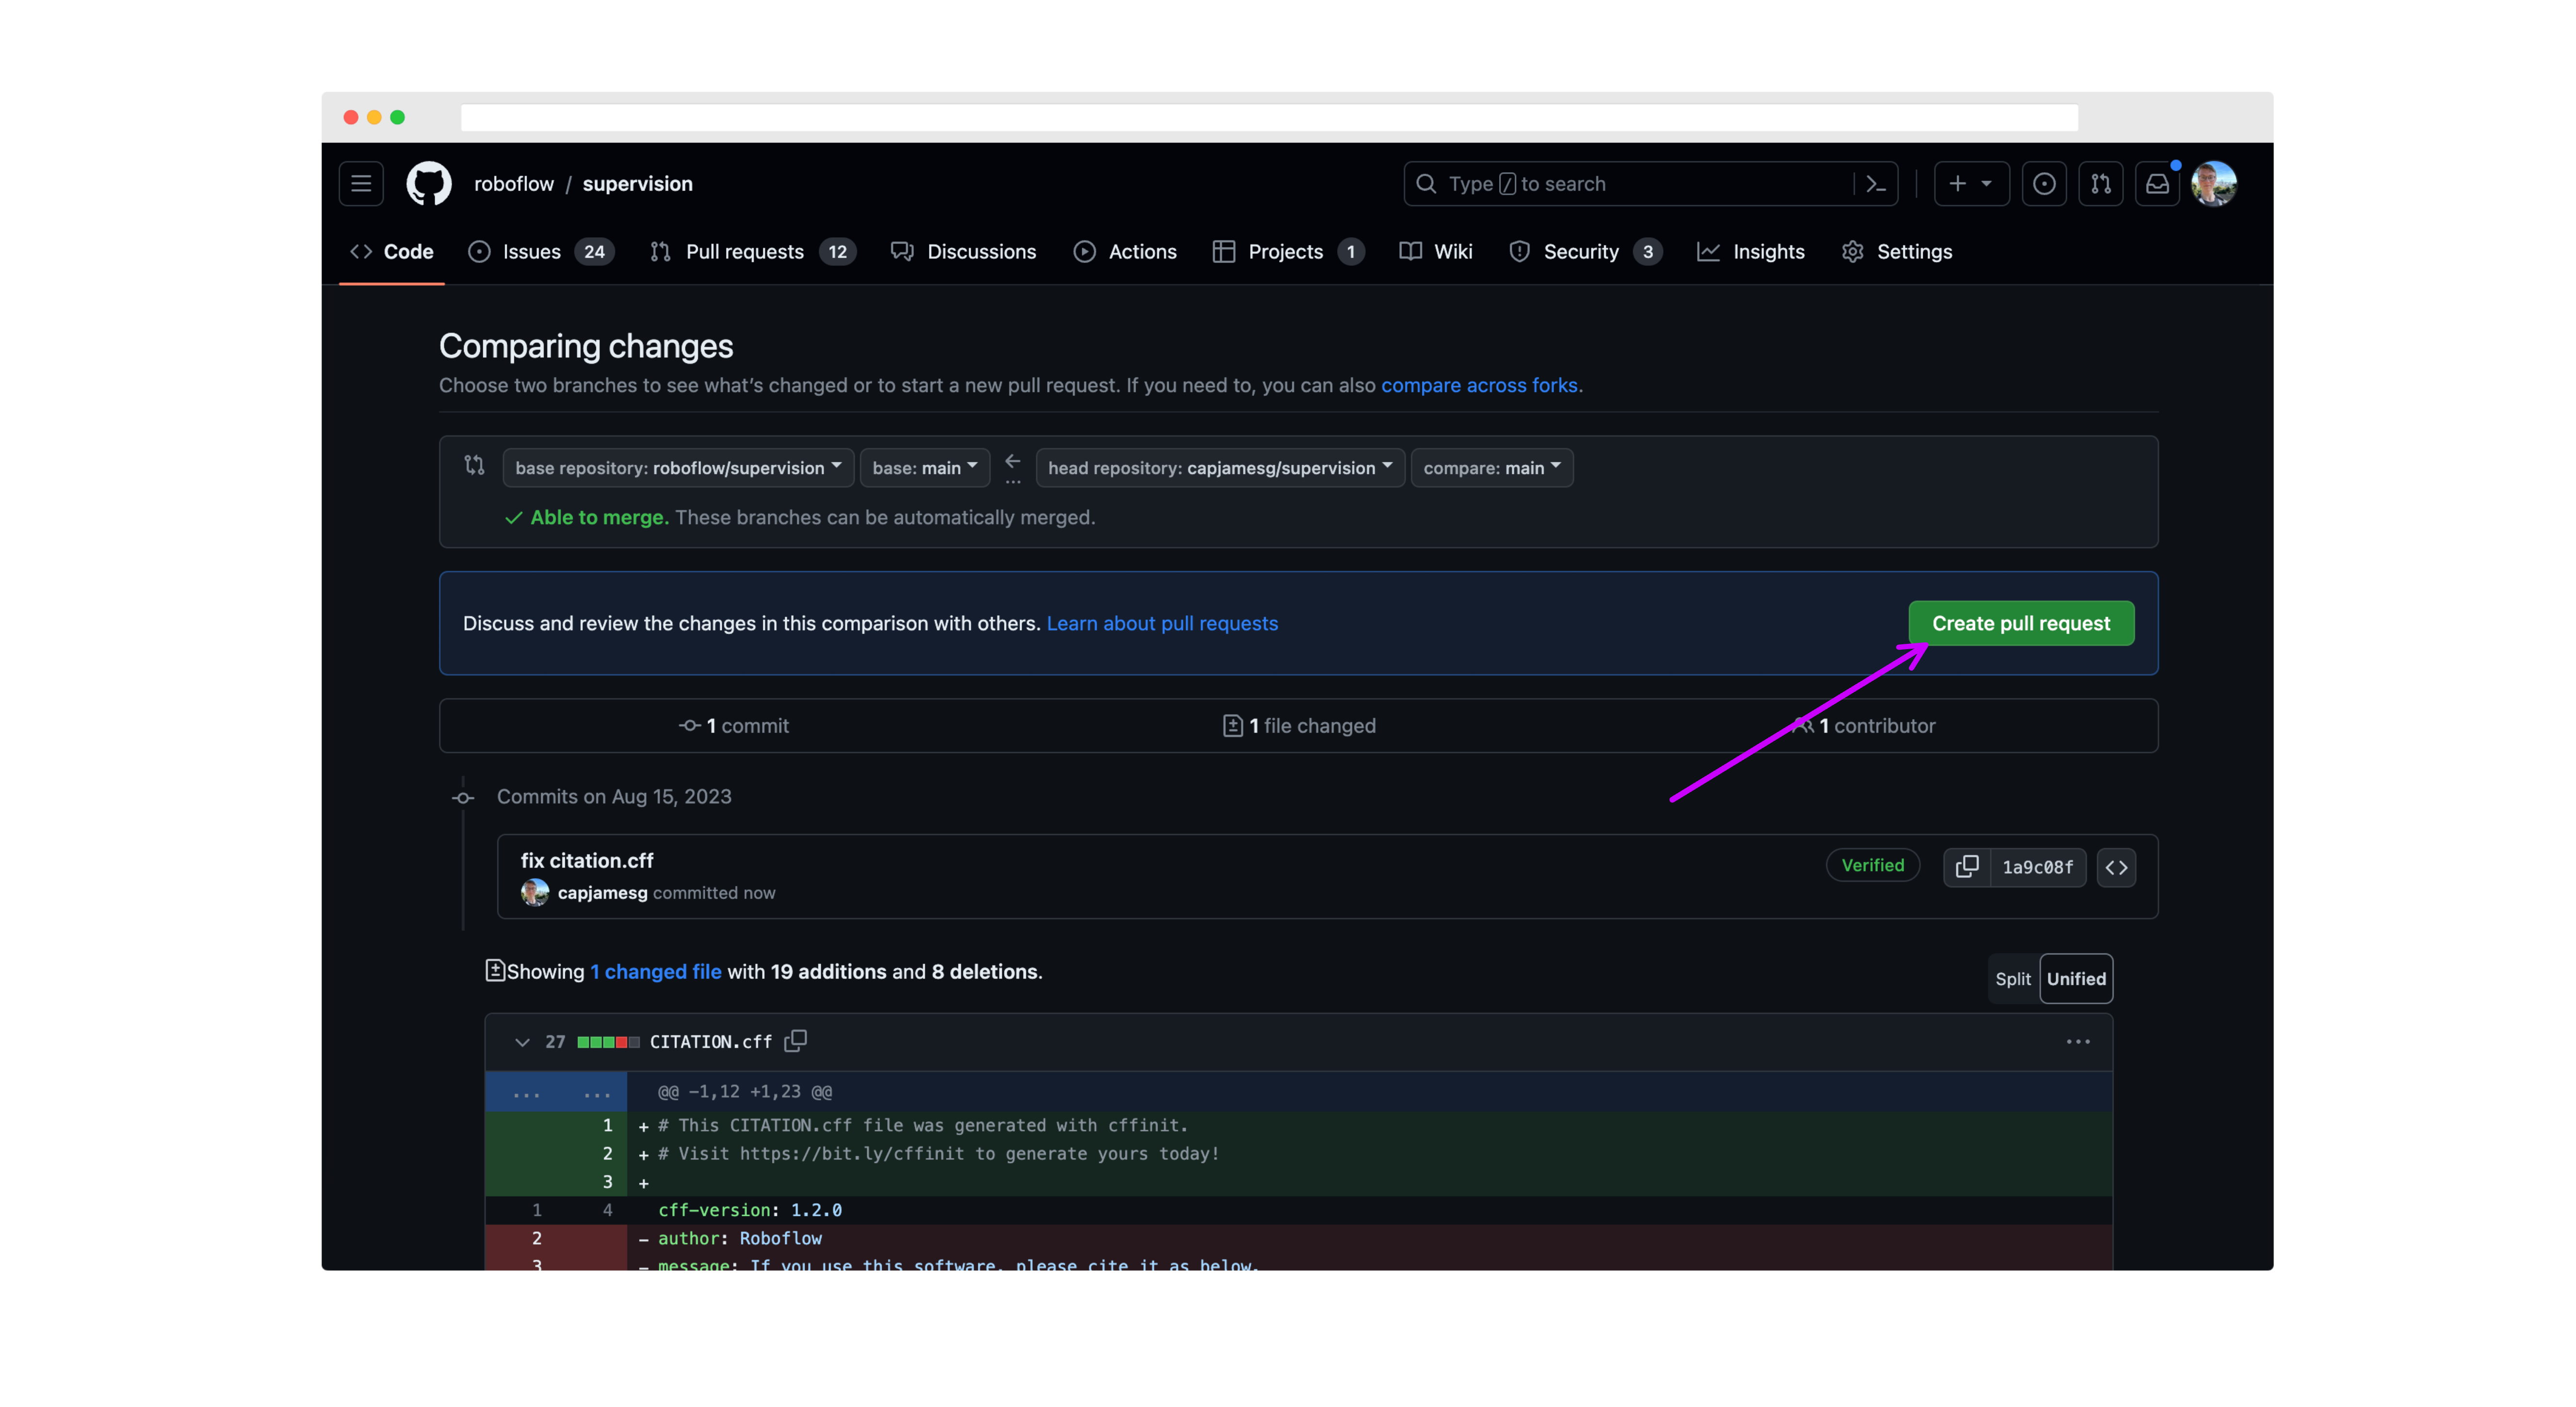
On the next page, review your changes then click "Create pull request":
|
|
|
|
|
|
|
|
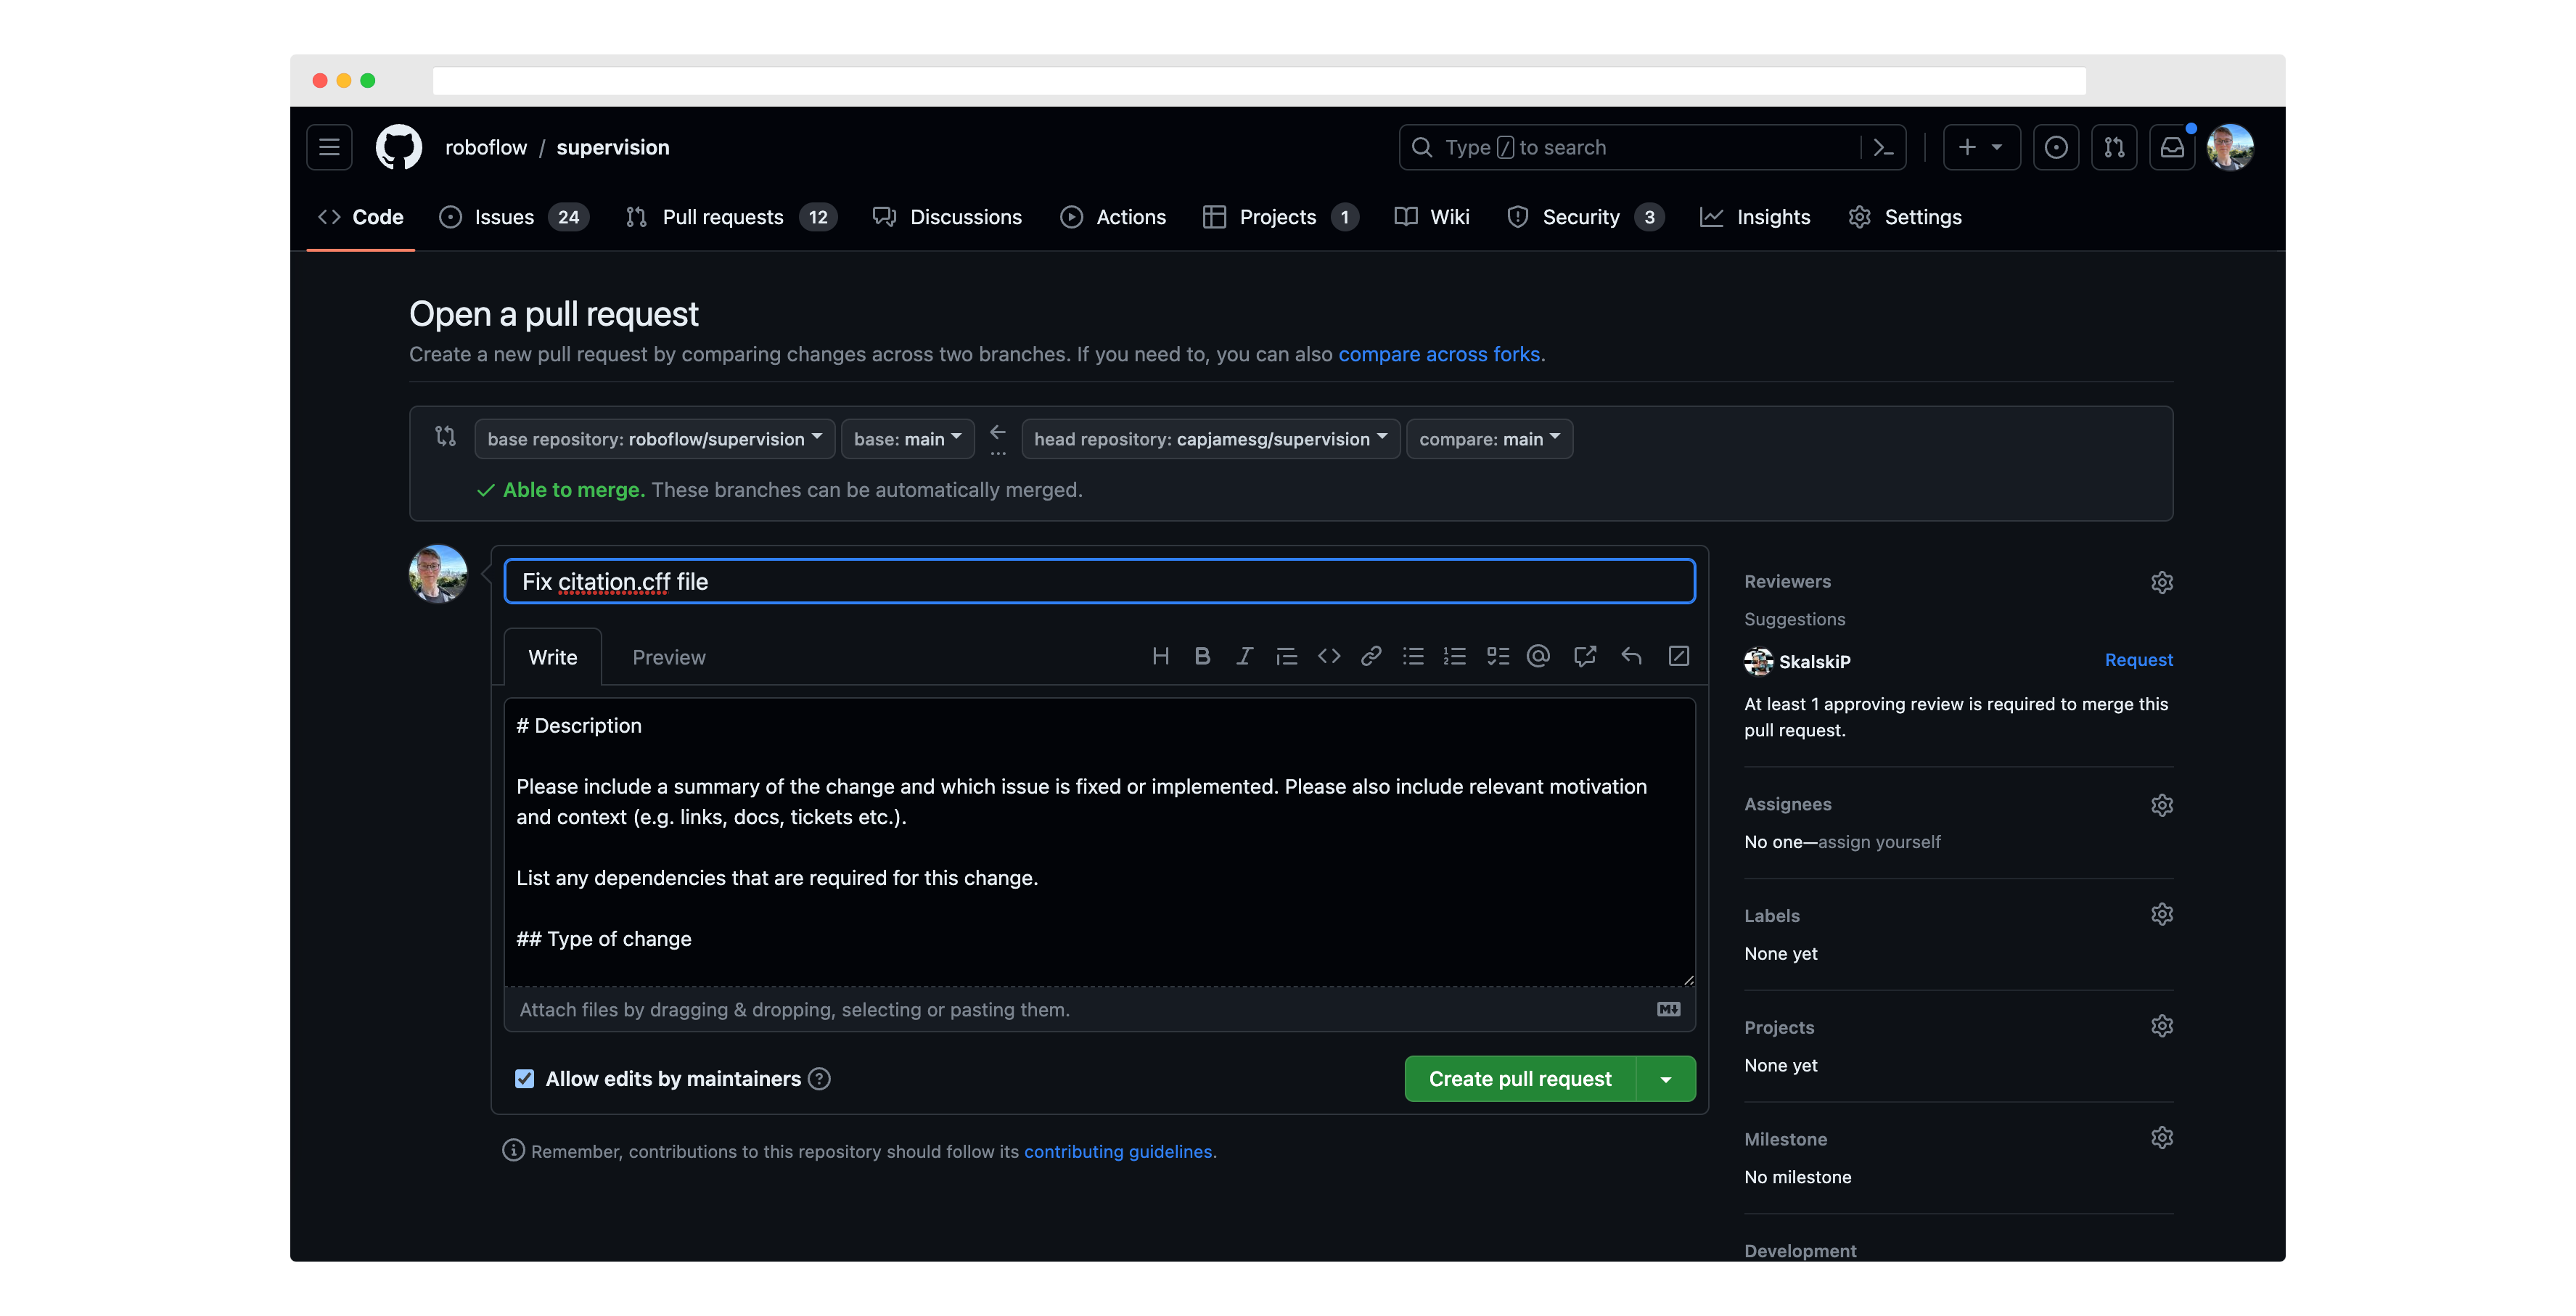
Next, write a description for your pull request, and click "Create pull request" again to submit it for review:
|
|
|
|
|
|
|
|
When creating new functions, please ensure you have the following:
|
|
|
|
1. Docstrings for the function and all parameters.
|
|
2. Unit tests for the function.
|
|
3. Examples in the documentation for the function.
|
|
4. Created an entry in our docs to autogenerate the documentation for the function.
|
|
5. Please share a Google Colab with minimal code to test a new feature or reproduce the issue whenever possible. Please ensure that Google Colab can be accessed without any restrictions.
|
|
|
|
When you submit your Pull Request, you will be asked to sign a Contributor License Agreement (CLA) by the `cla-assistant` GitHub bot. We can only respond to PRs from contributors who have signed the project CLA.
|
|
|
|
All pull requests will be reviewed by the maintainers of the project. We will provide feedback and ask for changes if necessary.
|
|
|
|
PRs must pass all tests and linting requirements before they can be merged.
|
|
|
|
## Installation for Contributors
|
|
|
|
Before starting your work on the project, set up your development environment:
|
|
|
|
1. **Clone your fork of the project:**
|
|
|
|
**Option A: Recommended for most contributors (shallow clone of develop branch):**
|
|
|
|
```bash
|
|
git clone --depth 1 -b develop https://github.com/YOUR_USERNAME/supervision.git
|
|
cd supervision
|
|
```
|
|
|
|
Replace `YOUR_USERNAME` with your GitHub username.
|
|
|
|
> **Note**: Using `--depth 1` creates a shallow clone with minimal history and `-b develop` ensures you start with the development branch. This significantly reduces download size while providing everything needed to contribute.
|
|
|
|
**Option B: Full repository clone (if you need complete history):**
|
|
|
|
```bash
|
|
git clone https://github.com/YOUR_USERNAME/supervision.git
|
|
cd supervision
|
|
git checkout develop
|
|
```
|
|
|
|
2. **Set up the upstream remote:**
|
|
|
|
```bash
|
|
git remote add upstream https://github.com/roboflow/supervision.git
|
|
git fetch upstream
|
|
```
|
|
|
|
3. **Create and activate a virtual environment:**
|
|
|
|
**On Linux/macOS:**
|
|
|
|
```bash
|
|
python3 -m venv .venv
|
|
source .venv/bin/activate
|
|
```
|
|
|
|
**On Windows:**
|
|
|
|
```cmd
|
|
python -m venv .venv
|
|
.venv\Scripts\activate
|
|
```
|
|
|
|
4. **Install `uv`:**
|
|
|
|
Follow the instructions on the [uv installation page](https://docs.astral.sh/uv/getting-started/installation/).
|
|
|
|
5. **Install project dependencies:**
|
|
|
|
```bash
|
|
uv pip install -r pyproject.toml --group dev --group docs --extra metrics
|
|
```
|
|
|
|
6. **Verify the setup:**
|
|
|
|
```bash
|
|
uv run pytest
|
|
```
|
|
|
|
## 🎨 Code Style and Quality
|
|
|
|
### Pre-commit tool
|
|
|
|
This project uses the [pre-commit](https://pre-commit.com/) tool to maintain code quality and consistency. Before submitting a pull request or making any commits, it is important to run the pre-commit tool to ensure that your changes meet the project's guidelines.
|
|
|
|
Furthermore, we have integrated a pre-commit GitHub Action into our workflow. This means that with every pull request opened, the pre-commit checks will be automatically enforced, streamlining the code review process and ensuring that all contributions adhere to our quality standards.
|
|
|
|
To run the pre-commit tool, follow these steps:
|
|
|
|
1. **Install pre-commit** (already included if you followed the installation steps above):
|
|
|
|
```bash
|
|
uv sync --group dev
|
|
```
|
|
|
|
2. **Navigate to the project's root directory** (if not already there).
|
|
|
|
3. **Run pre-commit checks**:
|
|
|
|
```bash
|
|
uv run pre-commit run --all-files
|
|
```
|
|
|
|
This will execute the pre-commit hooks configured for this project. If any issues are found, the pre-commit tool will provide feedback on how to resolve them. Make the necessary changes and re-run the command until all issues are resolved.
|
|
|
|
4. **Install pre-commit as a git hook** (optional but recommended):
|
|
|
|
```bash
|
|
uv run pre-commit install
|
|
```
|
|
|
|
This will automatically run pre-commit checks every time you make a `git commit`.
|
|
|
|
### Docstrings
|
|
|
|
All new functions and classes in `supervision` should include docstrings. This is a prerequisite for any new functions and classes to be added to the library.
|
|
|
|
`supervision` adheres to the [Google Python docstring style](https://google.github.io/styleguide/pyguide.html#383-functions-and-methods). Please refer to the style guide while writing docstrings for your contribution.
|
|
|
|
### Type checking
|
|
|
|
Currently, there is no systematic type checking with mypy implemented in the project. This is a known limitation that may be addressed in future updates.
|
|
|
|
## 📝 Documentation
|
|
|
|
The `supervision` documentation is stored in a folder called `docs`. The project documentation is built using `mkdocs`.
|
|
|
|
To run the documentation locally:
|
|
|
|
1. **Install documentation dependencies** (if not already installed):
|
|
|
|
```bash
|
|
uv sync --group docs
|
|
```
|
|
|
|
2. **Start the documentation server**:
|
|
|
|
```bash
|
|
uv run mkdocs serve
|
|
```
|
|
|
|
3. **Access the documentation** at `http://127.0.0.1:8000` in your browser.
|
|
|
|
You can learn more about mkdocs on the [mkdocs website](https://www.mkdocs.org/).
|
|
|
|
## 🧑🍳 Cookbooks
|
|
|
|
We are always looking for new examples and cookbooks to add to the `supervision`
|
|
documentation. If you have a use case that you think would be helpful to others, please
|
|
submit a PR with your example. Here are some guidelines for submitting a new example:
|
|
|
|
- Create a new notebook in the [`docs/notebooks`](https://github.com/roboflow/supervision/tree/develop/docs/notebooks) folder.
|
|
- Add a link to the new notebook in [`docs/theme/cookbooks.html`](https://github.com/roboflow/supervision/blob/develop/docs/theme/cookbooks.html). Make sure to add the path to the new notebook, as well as a title, labels, author and supervision version.
|
|
- Use the [Count Objects Crossing the Line](https://supervision.roboflow.com/develop/notebooks/count-objects-crossing-the-line/) example as a template for your new example.
|
|
- Pin the version of `supervision` you are using in the notebook.
|
|
- Place an appropriate "Open in Colab" button at the top of the notebook. You can find an example of such a button in the aforementioned `Count Objects Crossing the Line` cookbook.
|
|
- **Notebook should be self-contained**. If you rely on external data (videos, images, etc.) or libraries, include download and installation commands in the notebook.
|
|
- Annotate the code with appropriate comments, including links to the documentation describing each of the tools you have used.
|
|
|
|
## 🧪 Tests
|
|
|
|
[`pytest`](https://docs.pytest.org/en/7.1.x/) is used to run our tests.
|
|
|
|
To run tests:
|
|
|
|
```bash
|
|
uv run pytest
|
|
```
|
|
|
|
To run tests with coverage:
|
|
|
|
```bash
|
|
uv run pytest --cov=supervision
|
|
```
|
|
|
|
## 📄 License
|
|
|
|
By contributing, you agree that your contributions will be licensed under an [MIT license](https://github.com/roboflow/supervision/blob/develop/LICENSE.md).
|